Deployment automation in XL Deploy

Deployment automation in XL Deploy is great, but do not forget to automate the setup and configuration of your XL Deploy environment as well.

Try to avoid using the user interface and try to avoid adding entries to the dictionaries manually. In stead use the API to create all of your infrastructure, environments, and dictionaries. Treat the set up of XL Deploy as code!

Here is a link to their API: XL Deploy Rest API
And here is some example of how you could use it in a bash script.

# Helper methods for accessing XLDEPLOY API using CURL
del_ci() {

curl -H "Authorization: Basic $XLD_BASICAUTH" -k -X DELETE -H "Content-type:application/xml" $XLD_SERVER/deployit/repository/ci/$1 --data "<$2 id=\"$1\"></$2>"

}

add_ci() {

curl -H "Authorization: Basic $XLD_BASICAUTH" -k -X POST -H "Content-type:application/xml" $XLD_SERVER/deployit/repository/ci/$1 --data "<$2 id=\"$1\">$3</$2>"

}

update_ci() {

curl -H "Authorization: Basic $XLD_BASICAUTH" -k -X PUT -H "Content-type:application/xml" $XLD_SERVER/deployit/repository/ci/$1 --data "<$2 id=\"$1\">$3</$2>"

}

add_ci_from_file() {

curl -H "Authorization: Basic $XLD_BASICAUTH" -k -X POST -H "Content-type:application/xml" $XLD_SERVER/deployit/repository/ci/$1 -d@$2

}

add_ci Environments/test core.Directory
add_ci Environments/test/test_dict udm.Dictionary "<entries>
    <entry key=\"DATABASE_URL\">$dep_DATABASE_URL</entry>
    </entries>
  <encryptedEntries>
  	<entry key=\"DB_PASSWD\">$db_password</entry>
  </encryptedEntries>
  <restrictToContainers/>
  <restrictToApplications/>"

Keeping track of the dictionary keys in combination with the keys being used in certain versions of your deployable archives is very important in order to realize reliable and more consistent results.

In the end these kind of deployment robots like XL Deploy or Nolio will have to become more and more mature in supporting immutable server concepts so that code and configuration is exactly the same in all environments.
Continue reading

Porting the app to the MEAN stack

So far the reference application has been built on the Java EE stack for Java EE runtime environments. However, the same application can be build in other programming languages as well.

The MEAN stack consists of MongoDB, Express, AngularJS, and Node JS. Node JS is the main programming platform differentiator.

Porting the reference application consists of two parts: 1) Moving the static UI html and javascript Angular parts to NodeJS, and 2) Re-implementing the REST calls and servlet calls that are used in the controllers.

Part 1 is very easy as the original application was allready based on AngularJS. However there was one issue that needed to be resolved. By default the mongoose framework uses the property names of the documents in MongoDB as properties in the returned JSON objects in the REST API.

This is not always a desired feature. It can be resolved by either changing the AngularJS controller or by using a NodeJS framework that enables aliasing properties in mapping documents to objects.

Porting part 2 will depend on what kind of functionality and functions are used in the business and persistency layers. Implementing the CRUD functions on a MongoDB database using the mongoose and express modules of Node JS is straightforward. The only thing that you need to worry about on Bluemix is that you need to process the database connection details of your service which are available through parsing the VCAP_SERVICES environment variables. This JSON object contains information about the database connection and other services.

var mongoose = require('mongoose');
mongoose.set('debug', true)
var db;
if (process.env.VCAP_SERVICES) {
	   var env = JSON.parse(process.env.VCAP_SERVICES);
	   db = mongoose.createConnection(env['mongolab'][0].credentials.uri);
	} else {
		console.log("creating connection");
		db = mongoose.connect('mongodb://taxreturn:taxreturn@localhost:27017/taxreturns');
}

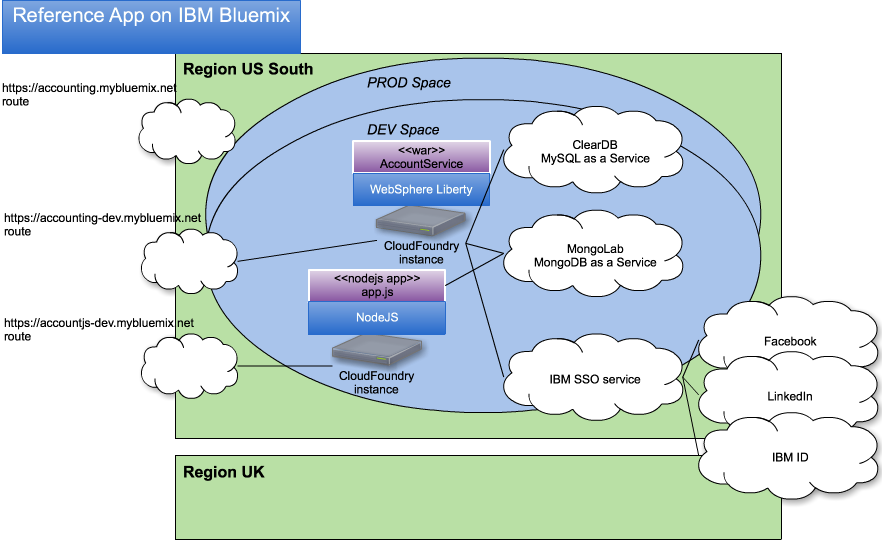
Now the Bluemix environment with a Java EE and a NodeJS application using the same MongoLab MongoDB instance looks like:Bluemix topology

Building a MongoDB topology using MMS automation

As mentioned in previous blogs the reference application can use MongoDB.
For this a MongoDB database needs to be set up. You can do this in any number of ways:

  1. Download the software on your server, start the mongod process and configure your application with the connection details
  2. Get MongoDB as a SaaS service from MongoLab or other providers, followed by the same steps

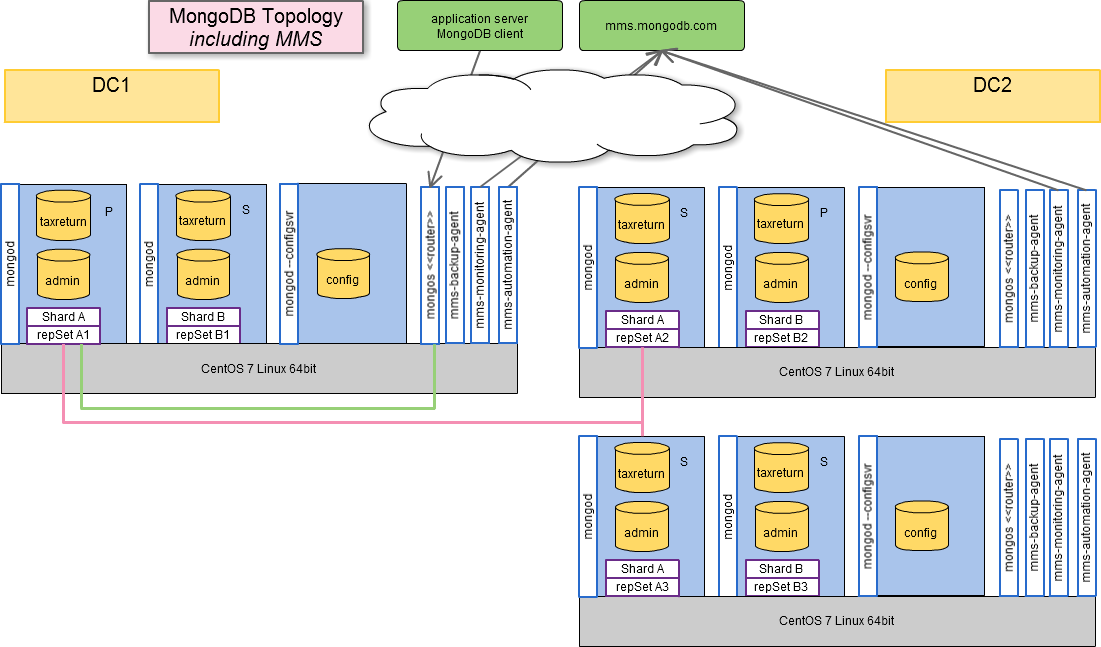
If you decide to build your own database, you can do so by configuring everything manually or using scripts, however you can also choose to use MMS as a kind of SaaS solution for managing your MongoDB environment. This can be done on private clouds/networks using your own dedicated MMS solution, or in the public cloud.

The picture below shows such an environment:
MongoDB topology

Using MMS to set up this complex topology is quite simple:

  1. Start by installing the automation agents. These will then connect to the mms.mongodb.com environment using some shared secrets that have been configured for your account. This will make these agents appear on your account.
  2. Then use the web interface of MMS to install monitor agents and/or backup agents and everything else that you need: standalone servers, sharded clusters etc.

The automation agents will automate all the deployment and installation tasks needed, such as:

  • downloading software of the desired version
  • upgrading versions of the agents and databases
  • configuring security
  • creating & changing clusters

Without MMS, I would have needed much more time to set up such a cluster. The alternative is to go SaaS all the way, where you don’t care anymore about how and where it is installed. In that case MongoLab solutions or the MongoLab within Bluemix solution is a good choice as well.

For now I think that using MMS in combination with your own infrastructure is a very good choice. And using a private MMS would be even better from a security and trust/privacy point of view.

Application landscape in the Bluemix cloud

The reference application that I am building is a Java EE application that runs on JBoss, WebSphere Liberty, WebSphere Full and can be run on local Windows or Mac laptops, on Raspberry Pi, in docker or on the IBM Bluemix cloud.

The picture below shows the landscape of the reference application in the Bluemix cloud.

Bluemix topology

In Bluemix you can choose in which region you want to host your application. E.g. UK or US South. Within each region you then have the opportunity to define spaces, such as dev, test, prod. Each space then consists of your application and bounded services.

Also Bluemix provides the opportunity to deploy your application in multiple ways: As a CloudFoundry app, as a docker container or as a virtual machine.

The reference application is deployed as a cloudfoundry app on a WebSphere Liberty instance. It is bounded to several services: The single sign on service, a MongoDB service from MongoLab, a MySQL service from ClearDB.

Currently, not all services are available in each region. This depends on the overall state of such a service. The Single Sign On service which offers OAUTH or OpenID integration was initially only available in the US South region. This service can be used to provide authentication functionality to your application. Your application then needs to provide autorisation based on the user id from the authentication system.

The reference application is aware of the authentication system. That is, it knows whether standard Java EE authentication with LDAP user registries in the Java EE container are being used or OAUTH is used.

All information of the services are available in CloudFoundry based environment variables as well as being defined as Java EE resources (MySQL datasource and MongoDB liberty database connection pool) in the liberty server configuration.

The code of the application can be deployed locally from Eclipse or other development tool, or from a build pipeline configured in the DevOpsServices environment. This environment is fully integrated with Bluemix, GIT and other tools and can be configured in such a way that an application will be automatically build, and deployed to one or more environments in Bluemix.

Content Security Policy, browsers and angularJS

In order to protect your application on the client side, content security filtering (CSP) has been introduced. It is basically an HTTP Header added by your web application to instruct a browser to handle content in a certain secure way.

Unfortunately, as it is dependent on the browser technology, not all browsers support CSP and not all browsers act on the same HTTP Header. However, for most recent browsers you can improve your overall security by introducing CSP. Older browsers will not use this additional safety.

With CSP enabled, you can instruct the browser to only allow JavaScript from trusted and file based resources. Disallowing inline JavaScript. The same applies for stylesheets and in-line styles.

You can enable CSP fully or in reporting mode. Fully means that the browser will block all non-allowed elements. In reporting mode, means that the browser will send reports back to the server of all things that are not allowed. These reports are posted in to a REST service hosted by your application. This is a nice way for developers to test their application and see whether or not everything works fine with CSP enabled.

Enabling CSP & AngularJS

Enabling CSP has impact on the frameworks you are using. Suppose you are using AngularJS and/or BootStrap. Then you might need to set up things a bit different.

In AngularJS 1.3.9 you need to include a stylesheet angular-csp.css seperately. Also, you should add ng-csp as an attribute in your html tag.

Then start debugging in your browser to see what goes wrong and should be changed in your application to make it more safe.

HTTP Headers

The HTTP Headers you should provide are at least the following:

  • Content-Security-Policy
  • X-Content-Security
  • Content-Security-Policy
  • X-WebKit-CSP

The values can be the same for each header, but this will cover most browsers. -Report-Only can be added in reporting mode.

More info

For more info see the official web sites on CSP and check out sample implementations on OWASP.

You should start using CSP early in your project development. Because it will be hard to fix all non compliant issues later on.

Managed webservice clients

One of the application server specific things is the use of managed web service clients. Especially since you will always want to configure the location of your service endpoints.

WebSphere Liberty and WebSphere Regular also do this their own way.

Let’s start with development of a managed web service client. Start with a wsdl and generate the client code. Then use @WebServiceRef to link your servlet or ejb code to the service client.

@Singleton
@Path("/payments")
@DeclareRoles({ "BANKADMIN", "BANKUSER" })
public class ExpenseService {

	@WebServiceRef(name = "ws_PaymentWebService", value = PaymentWebService.class)
	private PaymentInterface service;

When you do not provide any more information, the endpoint address is determined from the wsdl that is accessible for the client.

You can override this for WebSphere with the use of the ibm-webservicesclient-bnd.xmi file, and for WebSphere Liberty using the ibm-ws-bnd.xml

ibm-webservicesclient-bnd.xmi for WebSphere Application Server

<?xml version="1.0" encoding="UTF-8"?>
<com.ibm.etools.webservice.wscbnd:ClientBinding xmi:version="2.0" xmlns:xmi="http://www.omg.org/XMI" xmlns:com.ibm.etools.webservice.wscbnd="http://www.ibm.com/websphere/appserver/schemas/5.0.2/wscbnd.xmi" xmi:id="ClientBinding_1427118946547">

  <serviceRefs xmi:id="ServiceRef_1427119116658" serviceRefLink="ws_PaymentWebService">
    <portQnameBindings xmi:id="PortQnameBinding_1427119116658" portQnameNamespaceLink="http://soap.zubcevic.com/" portQnameLocalNameLink="PaymentWebServicePort" overriddenEndpointURI="https://localhost:9443/accountservice/PaymentWebService"/>
  </serviceRefs>

</com.ibm.etools.webservice.wscbnd:ClientBinding>

Once you have added this binding file, you can add instructions during the deployment process to override the actual timeout and endpoint values for a particular environment. This is done using additional install parameters in Jython/wsadmin or e.g. in XLDeploy:

<was.War name="accountservice" groupId="com.zubcevic.accounting"
         artifactId="accountservice">
  <contextRoot>accountservice</contextRoot>
  <preCompileJsps>false</preCompileJsps>
  <startingWeight>1</startingWeight>
  <additionalInstallFlags>
      <value>-WebServicesClientBindPortInfo [['.*'  '.*' '.*'  '.*' 30 '' '' '' 'https://myserver1/accountservice/PaymentWebService']]</value>
  </additionalInstallFlags>
</was.War>

ibm-ws-bnd.xml for WebSphere Liberty

<?xml version="1.0" encoding="UTF-8"?>
<webservices-bnd xmlns="http://websphere.ibm.com/xml/ns/javaee"
		xmlns:xsi="http://www.w3.org/2001/XMLSchema-instance"
		xsi:schemaLocation="http://websphere.ibm.com/xml/ns/javaee http://websphere.ibm.com/xml/ns/javaee/ibm-ws-bnd_1_0.xsd"
		version="1.0">
	<service-ref name="ws_PaymentWebService" wsdl-location="WEB-INF/wsdl/PaymentWebService.wsdl">
		<port name="PaymentWebServicePort" namespace="http://soap.zubcevic.com/"
				address="https://localhost:9443/accountservice/PaymentWebService" username="admin" password="password"/>
	</service-ref>

</webservices-bnd>

Some may say, that you could make things more easy by doing it yourself (unmanaged service client) and reading some endpoint configuration from a property file. But it will get more and more difficult when you want to additional configuration like SSL transport security settings, basic authentication, WS Addressing, WS Security and others.
With managed clients you can have this stuff get arranged by the application server. In stead of building your own application server capabilities in your application.

Flexible persistency – SQL or NoSQL

The reference application that I am building, supports both relational database or document database persistency.

The object model of my application consists of classes that are used in both. A factory determines dynamically whether to use a SQL or a NO-SQL database.  Or to be more precise, MySQL or MongoDB.

Java EE JPA is used to make it fit almost any SQL database, while MongoDB specific API is used to operate on MongoDB. Alltough JPA stands for Java Persistency API and is therefore not necessarily related to SQL databases, the use of specific annotations more or less assume that SQL databases are used.

In my application the domain objects do have JPA annotations and are used by an entity manager for persistence in MySQL and a bespoke document manager for MongoDB. All implementing the same interface.

The interface looks like:

@Local
public interface BankAccountManager {

	
	public List<BankAccount> getBankAccounts(User user);
	public List<MoneyTransfer> getMutations(BankAccount bank);
	public void storeMutations(BankAccount bAccount,List<MoneyTransfer> transfers);
	
}

The factory for getting the right implementation looks like:

@Singleton
public class BankAccountManagerFactory {

	@EJB(beanName="BankAccountDocumentManager")
    private BankAccountManager docManager;
    
	@EJB(beanName="BankAccountEntityManager")
    private BankAccountManager entityManager;
    
	private BankAccountManager expManager;
	
	private boolean isDoc = false;      
	
	@PostConstruct
	public void initEM() {
		if (isDoc) {
			expManager = docManager;
		} else {
			expManager = entityManager;
		}
	}
    
	public BankAccountManager getBankAccountManager() {
		return expManager;
	}
	
}

In this example, the choice for using one or the other is hardcoded, but merely used as an example that you can switch based on something in your code path. The names of the EJB’s will be matched to the correct implementations of the EJB’s for this same interface. The names must be specified otherwise the correct implementation cannot be determined by your container.

A sample class that uses the BankAccountManager then looks like:

@WebServlet("/upload")
@MultipartConfig
public class UploadSwift extends HttpServlet {
	
	private static final long serialVersionUID = 1L;
	@EJB private BankAccountManagerFactory bankAccountManager;

So in my application I could have chosen to use @EJB(beanName=”BankAccountEntityManager”) in my servlet, but that would make it really hardcoded. Using the factory I can determine it by some other rule. It’s still a hardcoded boolean at the moment, but could also be an environment variable or such thing.

In a future post, I will explain more about the differences in schema design and differences between relational and document oriented data.

Database independent JPA

Java EE 6 contains the JPA 2.0 specification. This means that applications that are built using this interface can be run using application servers that have their own implementation of the JPA 2.0.

Using JPA 2.0 in a Maven enabled Java project would require only this single dependency at provided scope:

<dependency>
	<groupId>javax</groupId>
	<artifactId>javaee-api</artifactId>
	<version>6.0</version>
	<scope>provided</scope>
</dependency>

Does this also mean, that your code can run on any database? No, it does not. It depends for instance on the capabilities of your database. A simple example is the use of auto generated numbers for primary keys. Oracle 11g does not support this, while Derby and MySQL databases do understand this.

The following code therefore, is only applicable to databases that understand and support the concept:

@Entity(name="users")
public class User {

    @Id
    @GeneratedValue(strategy=GenerationType.IDENTITY)
    @XmlTransient
    @Column(name="user_id")
    private int id;

Oracle 11g users may need to use values taken from sequences:

@Entity(name="users") 
public class User { 

     @Id 
     @GeneratedValue(strategy=GenerationType.SEQUENCE, generator="USER_SEQ")        
     @SequenceGenerator(name="USER_SEQ", sequenceName="USER_SEQ", allocationSize=10) 
     @XmlTransient 
     @Column(name="user_id") 
     private int id; 

Again, this is not a bad thing. Using the capabilites of a particular database has real benefit. However, it is wise to keep this in mind while developing and testing your solution. Once you start using functionality of a database that goes beyond simple SQL operations, you really should have such a database available in your development and test environment.

Platform specific resource binding

One of the most obvious problems of running your application anywhere is determining how your Java EE application can use application server resources.

Always use resource references is the best choice to start with. Not only will you prevent a hard link between application and runtime configuration, but jndi namespace bindings can typically cause problems. 

Binding deployment descriptors are a way to facilitate easy deployment in your IDE environment. Both JBoss as well as Glassfish and WebSphere make use of these binding files. This also implies that if you want to develop applications on JBoss as well as WebSphere, that you will need to supply both sets of binding files.

So that’s what I did to get my jdbc datasources up and running for both JBoss and Liberty.

In order to get it working on the Bluemix cloud, I had to choose to set the IBM specific binding files to use the resources according to Bluemix.

In IBM Bluemix, you can deploy applications in containers, VM’s as well as Liberty profiles on Cloudfoundry.

I user the latter approach. Then when you bind a ClearsDB MySQL, the name of the service will be bound to jdbc/servicename in the Liberty profile.

All information to connect is allready available and configured in that Liberty instance based on the bound service. You only need to bind your application resource reference to that specific resource.

That’s a Java EE app using a real datasource which is bound dynamically to your database as a service.

Write once, run anywhere?

Is it feasible to write enterprise applications in Java once while still being able to run them ‘anywhere’?

Yes, no, maybe, it depends…

The idea of the Java software development platform is based on this WODRA concept. Developers build an application using a standardized set of platform independent API’s and once the Java code is compiled to byte code it is the Java runtime environment that will make sure it runs everywhere.

In real life, it turns out to be very difficult to move applications from one environment to another. In the past I have worked on some of the replatforming projects.

Usually it involves different versions of the Java Runtime Environment, different versions of Java EE, different vendors of the former. As well as applications that have been build to use the bespoke features of the platform of choice. Something that isn’t necessarily a bad choice, but will make the effort of replatforming somewhat more difficult.

I have decided to create a Java EE 6 reference application. The goal of the reference application is to demonstrate that it is possible to create truly portable applications. Even at an advanced enterprise application level. But also to illustrate which design principles to take into account and to share my experiences in lessons learned about what to do and not to do for portability of applications.

I am allready confident that building a Java EE reference application will mean more work than building a solution for a target platform. However, I do beleive that it will help to determine best practices and design guidelines as well as insight in the portability and replatformability of Java EE enterprise applications.

I will use the following environments:

  • Windows, Linux CentOS, MacOS
  • Java JRE 6, Java JRE 7
  • Redhat JBOSS 7.1,  IBM WebSphere Liberty 8.5.5.3, IBM Bluemix
  • MySQL, Derby SQL databases (portability of JPA e.g.)
  • MongoDB (with and without application server support)
  • Java Security vs. OAUTH